
In today’s digital landscape, ensuring the security and integrity of distributed software is paramount. Users are increasingly cautious about the applications they download and run, and operating systems often present warnings for unsigned executables. This guide provides a comprehensive walkthrough for developers using HTML Executable to digitally sign their generated applications using Microsoft’s Azure Trusted Signing service, enhancing user trust and application credibility.
1. Introduction: Secure Your HTML Executable Applications with Azure Trusted Signing
The Imperative of Code Signing
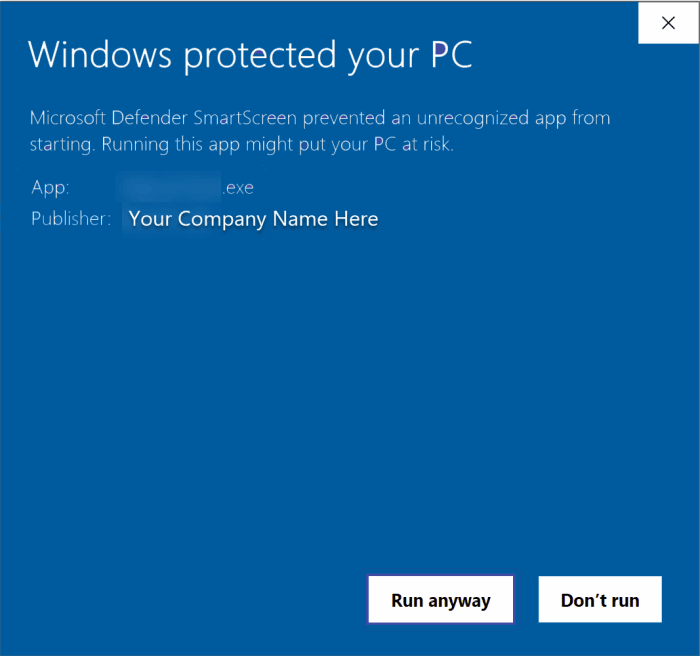
When users download an application, they need assurance that it originates from a legitimate publisher and has not been maliciously altered. Digital signatures provide this assurance. A signed executable file carries cryptographic proof of its origin (authenticity) and that its contents have remained unchanged since it was signed (integrity). Conversely, distributing unsigned executables can lead to significant hurdles. Modern operating systems, like Windows with its Defender SmartScreen, often flag unsigned applications, presenting users with intimidating warnings. These warnings can erode user confidence, potentially leading to lower download and adoption rates, regardless of the application’s quality.
Introducing Azure Trusted Signing
Azure Trusted Signing is a cloud-based code signing service offered by Microsoft. It aims to streamline the complexities traditionally associated with obtaining and managing code signing certificates. As a managed service, it handles much of the certificate lifecycle, allowing developers to focus more on their applications. While the initial setup within the Azure ecosystem involves several steps, the integration with tools like HTML Executable, once configured, can offer a robust and modern approach to code signing.
Post Objective
This article serves as a detailed, step-by-step tutorial specifically for users of HTML Executable. It will guide developers through the process of configuring HTML Executable and the necessary prerequisite tools to leverage Azure Trusted Signing for their compiled .EXE publications. While a complete Azure Trusted Signing setup (including account creation and identity validation) is a foundational requirement, this guide will primarily focus on the installation of supporting tools and the specific configuration steps within HTML Executable. Understanding the “why” – the critical importance of code signing – provides the motivation to navigate the “how” – the technical steps involved in the setup.
2. Laying the Groundwork: Prerequisites for Azure Trusted Signing
Before diving into the HTML Executable configuration, it’s crucial to ensure that the Azure environment is correctly set up and all necessary local tools are installed. Attempting to configure HTML Executable without these prerequisites in place will likely lead to errors and frustration.
A. Understanding Your Azure Trusted Signing Essentials
A fully functional Azure Trusted Signing environment is the bedrock of this process. This involves several key components within the Azure portal:
- Trusted Signing Account: This is the primary resource in Azure that houses your code signing certificate profiles and related configurations. When creating this account, it’s important to note that the name must be globally unique and adhere to specific naming conventions, typically involving 3 to 24 alphanumeric characters, starting with a letter, and ending with a letter or number, without consecutive hyphens.
- Certificate Profile: Within your Trusted Signing Account, one or more Certificate Profiles must be created. These profiles define the characteristics of the signing certificate, such as whether it’s for public trust (for broadly distributed software) or private trust (for internal use), and are linked to your validated identity.
- Identity Validation: For public trust certificates, Azure mandates a rigorous identity validation process. This step verifies the legal identity of the individual or organization requesting the certificate. It can involve submitting official documentation and may take some time to complete.5This validation is critical for establishing the trustworthiness of the signed applications.
Setting up these Azure components is a detailed process in itself. Developers should consult the official Microsoft Azure documentation for comprehensive instructions on creating a Trusted Signing Account, configuring Certificate Profiles, and completing the identity validation procedure. This guide presumes these Azure-side prerequisites are already met.
If not, visit our tutorial about setting up an Azure Trusted Signing account.
B. Essential Tools Installation – The Local Setup
Several tools must be installed on the developer’s local machine to enable HTML Executable to communicate with Azure Trusted Signing and perform the signing operation. These tools form a functional chain: the Azure CLI handles authentication, the Trusted Signing Client Tools provide the necessary libraries for SignTool to interface with Azure, and SignTool executes the actual digital signature application.
- i. Microsoft Azure CLI: The Azure Command-Line Interface (CLI) is an indispensable tool for managing Azure resources and, critically for this process, for authenticating your development machine with your Azure account. This authentication is achieved via the az login command.
- Action: Download and install the Azure CLI from the official Microsoft Azure CLI page.
- ii. Microsoft Trusted Signing Client Tools: This package includes essential components required for Azure Trusted Signing to function with local signing tools. Notably, it contains Azure.CodeSigning.Dlib.dll, a library that extends SignTool’s capabilities to work with Azure’s cloud-based signing service.
- Action: Download and install the Trusted Signing Client Tools. According to documentation, these tools are often installed in a path similar to
C:\Users\LOGIN NAME\AppData\Local\Microsoft\MicrosoftTrustedSigningClientTools\, whereLOGIN NAMEis your Windows username.
- Action: Download and install the Trusted Signing Client Tools. According to documentation, these tools are often installed in a path similar to
- iii. SignTool.exe (from Windows SDK): SignTool.exe is Microsoft’s standard command-line utility for digitally signing files. When used with Azure Trusted Signing, it leverages the aforementioned Dlib extension to interact with the Azure service.
- Action:
SignTool.exeis distributed as part of the Windows SDK. If it’s not already installed, or if an older version is present, download the latest Windows SDK. During the SDK installation, ensure that the “Windows SDK Signing Tools For Desktop Apps” component is selected for installation. A common installation path forSignTool.exeisC:\Program Files (x86)\Windows Kits\10\bin\SDK_VERSION\x64\signtool.exe(replaceSDK_VERSIONwith the specific version number of the SDK installed, e.g.,10.0.22621.0).
- Action:
HTML Executable itself performs checks for the presence of SignTool.exe and the Azure.CodeSigning.Dlib.dll (referred to as the Dlib SignTool extension in its UI, as seen in the provided screenshot). This means that correct installation and later, correct path configuration within HTML Executable, are vital not just for the signing process itself, but for the software to even allow configuration of Azure Trusted Signing.
3. Configuring HTML Executable for Azure Trusted Signing
With the Azure prerequisites met and local tools installed, the next stage is to configure HTML Executable to use Azure Trusted Signing. This involves specifying tool paths and then entering your Azure service credentials directly into the HTML Executable interface.
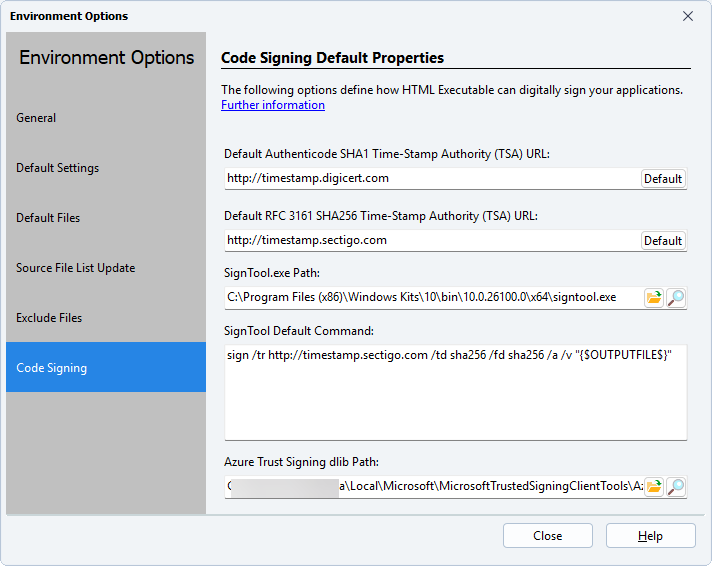
A. Preliminary Step: Configuring Tool Paths in HTML Executable’s Environment Options
Before navigating to the main code signing settings, HTML Executable must be informed of the locations of SignTool.exe and the crucial Azure.CodeSigning.Dlib.dll file. This is a critical preliminary step often overlooked, but essential for the subsequent configuration to succeed. Without these paths correctly set, HTML Executable cannot locate the necessary components to interact with Azure Trusted Signing or even perform the signing operation.
- Action:
- Open HTML Executable.
- Navigate to the software’s Environment Options. File > Environment Options.
- Within the Environment Options, locate the fields designated for the paths to
SignTool.exeandAzure.CodeSigning.Dlib.dll. - Enter the full paths to where these files are located on your system, based on your installations from Section 2.B.ii and 2.B.iii. For example:
SignTool.exepath:C:\Program Files (x86)\Windows Kits\10\bin\10.0.22621.0\x64\signtool.exe(adjust version as needed).Azure.CodeSigning.Dlib.dllpath:C:\Users\YOUR_LOGIN_NAME\AppData\Local\Microsoft\MicrosoftTrustedSigningClientTools\Azure.CodeSigning.Dlib.dll(replaceYOUR_LOGIN_NAMEwith your actual Windows username).
Correctly setting these paths is fundamental, as the HTML Executable UI provides feedback on whether these tools are found when configuring code signing options.
B. Accessing the Code Signing Hub in HTML Executable
Once the environment options are set, proceed to the dedicated code signing section within HTML Executable.
- Action: In HTML Executable, navigate to the
Securitytab, and then selectCode Signing:
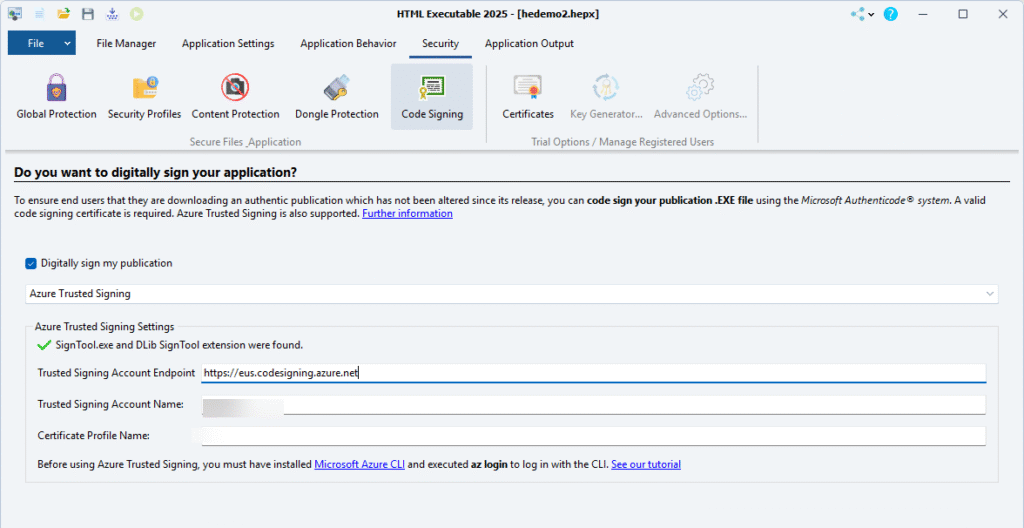
C. Enabling Digital Signing & Selecting Azure Trusted Signing
Within the Code Signing section, activate the digital signing feature and choose Azure Trusted Signing as the method.
- Action:
- Check the box labeled “Digitally sign my publication”.
- From the dropdown menu directly below this checkbox, select “Azure Trusted Signing” as the signing method.
At this point, HTML Executable will attempt to verify the presence of the required tools based on the paths configured in Environment Options. The interface includes a status message: “SignTool.exe and Dlib SignTool extension were found” (visible in the screenshot).
- If this message appears with a success indicator (e.g., a green checkmark), it confirms that HTML Executable has located the necessary tools.
- If an error is displayed here, revisit Section 2.B to ensure the tools are correctly installed and Section 3.A to verify the paths in Environment Options are accurate.
D. Entering Your Azure Credentials – The Key Connection
The final step in configuring HTML Executable is to provide the specific details that link the software to your Azure Trusted Signing account and certificate profile. These fields are clearly laid out in the HTML Executable UI under the “Azure Trusted Signing Settings” section.
- i. Trusted Signing Account Endpoint:
- Description: This is the region-specific URL for your Azure Trusted Signing account. Communication with the Azure service is routed through this endpoint.
- How to find it: This URL is typically displayed on the overview page of your Trusted Signing Account in the Azure portal after it has been created. It is crucial to use the endpoint URL that corresponds to the Azure region where your Trusted Signing Account was established. Using an incorrect regional endpoint will result in connection failures.
- Azure Trusted Signing Account Endpoints by Region:
| Region | Endpoint URL |
| East US | https://eus.codesigning.azure.net |
| West US 3 | https://wus3.codesigning.azure.net |
| West Central US | https://wcus.codesigning.azure.net |
| West US 2 | https://wus2.codesigning.azure.net |
| North Europe | https://neu.codesigning.azure.net |
| West Europe | https://weu.codesigning.azure.net |
*[4]*
- ii. Trusted Signing Account Name:
- Description: This is the unique name you assigned to your Trusted Signing Account when you created it in the Azure portal.
- How to find it: Refer to your Trusted Signing Account details in the Azure portal.
- iii. Certificate Profile Name:
- Description: This is the name of the specific Certificate Profile (e.g., “PublicTrustProfile,” “MyOrgSigningProfile”) that you created within your Azure Trusted Signing Account and intend to use for signing your HTML Executable publications.
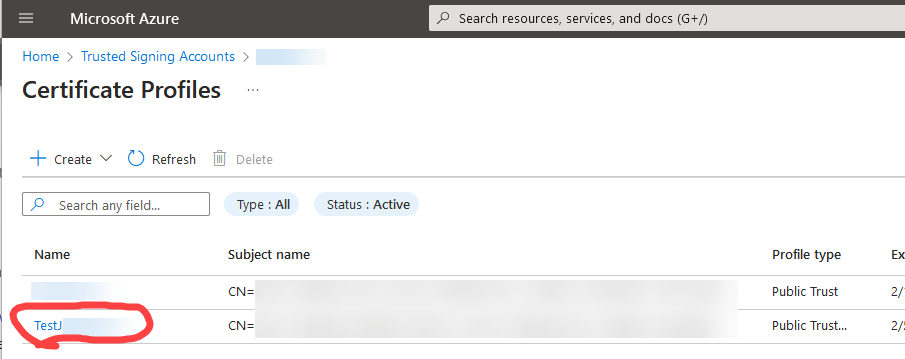
- How to find it: Refer to the Certificate Profiles listed within your Trusted Signing Account in the Azure portal (screenshot above).
To further clarify the mapping, consider the following summary:
HTML Executable Azure Signing Configuration Fields
| Field Name (in HTML Executable UI) | Description | Source/Example (Where to find in Azure) |
| Trusted Signing Account Endpoint | The regional URL for your Azure Trusted Signing service. | Azure portal: Overview page of your Trusted Signing Account (select correct region from table above). Example: https://eus.codesigning.azure.net |
| Trusted Signing Account Name | The unique name of your Azure Trusted Signing Account. | Azure portal: Name given during Trusted Signing Account creation. Example: MyCompanySigningAccount |
| Certificate Profile Name | The name of the certificate profile to be used for signing. | Azure portal: Name given during Certificate Profile creation within the account. Example: AppSignCertProfile |
Filling these fields accurately is paramount for a successful connection and signing operation. The logical flow from setting Environment Options to inputting these Azure-specific details within the Security tab mirrors the user’s interaction with the HTML Executable software, making the process intuitive.
4. Authenticating and Signing Your Application
With HTML Executable configured, the final steps involve authenticating your session with Azure and then letting HTML Executable handle the signing process during application compilation.
A. The Crucial az login Command: Authenticating with Your Azure Account
Before HTML Executable can instruct SignTool (via the Dlib extension) to use the Azure Trusted Signing service, your current command-line session must be authenticated with Azure. This is not a one-time setup but rather a prerequisite for each signing session, or at least periodically, as authentication tokens can expire.
- Action:
- Open a command-line interface such as PowerShell or Command Prompt.
- Execute the following command:
az login - This command will typically open a web browser window, prompting you to sign in with the Azure account credentials that are associated with your Trusted Signing Account and Certificate Profile.4 Complete the login process in the browser.
- Upon successful authentication, the command-line interface will confirm the login.
It is important to understand that this az login step establishes an active Azure session that the signing tools will leverage. If HTML Executable is configured today, but an attempt to sign is made days later without re-authenticating via az login (if the previous session has expired), the signing process will likely fail due to authentication issues.
B. How HTML Executable Performs the Signing
One of the key benefits of integrating Azure Trusted Signing with HTML Executable is the abstraction of complex command-line operations. Once the prerequisites are met, tools installed, HTML Executable configured, and the Azure session authenticated via az login, the actual signing process becomes straightforward from the user’s perspective.
HTML Executable will automatically invoke SignTool.exe with the appropriate parameters derived from the UI settings (Endpoint, Account Name, Profile Name) and utilize the Azure.CodeSigning.Dlib.dll to communicate with the Azure Trusted Signing service. This happens as part of the normal application build process.
- Action:
- Ensure all previous configuration steps are complete and that you have an active Azure session (perform
az loginif necessary). - In HTML Executable, proceed to build your publication as you normally would (e.g., by clicking the “Build” or “Compile” button).
- Ensure all previous configuration steps are complete and that you have an active Azure session (perform
If all settings are correct and the Azure authentication is valid, HTML Executable will manage the signing process in the background. The resulting .EXE file generated by HTML Executable will be digitally signed with the certificate from your Azure Trusted Signing Certificate Profile.
5. Troubleshooting Common Issues & Best Practices
While the process aims to be streamlined, various factors can lead to issues. This section outlines common problems and offers best practices for a smoother code signing experience.
A. Common Stumbling Blocks
Anticipating potential issues can save considerable time and effort. The multi-component nature of this setup (Azure services, local tools, software configuration, authentication) means there are several points where things can go awry.
- “SignTool.exe or Dlib not found” error in HTML Executable UI:
- Solution: This typically indicates an issue with tool installation or path configuration.
- Verify that SignTool.exe (from Windows SDK) and the Microsoft Trusted Signing Client Tools (containing
Azure.CodeSigning.Dlib.dll) are correctly installed (see Section 2.B). - Double-check that the paths to
SignTool.exeandAzure.CodeSigning.Dlib.dllare accurately entered in HTML Executable’s Environment Options (see Section 3.A).
- Verify that SignTool.exe (from Windows SDK) and the Microsoft Trusted Signing Client Tools (containing
- Solution: This typically indicates an issue with tool installation or path configuration.
- Authentication Errors / Access Denied during signing:
- Solution: These errors usually point to problems with Azure authentication or permissions.
- Ensure that the
az logincommand was executed successfully in a command prompt before attempting to build and sign in HTML Executable. - Confirm that you logged in with the correct Azure account – the one that owns the Trusted Signing Account and Certificate Profile.
- Verify that the Azure account used has the “Trusted Signing Certificate Profile Signer” role assigned for the specific Certificate Profile you are trying to use. This role is essential for authorizing the signing operation.4 This can be checked in the Access control (IAM) section of your Trusted Signing Account in the Azure portal.
- Check the status of your Azure subscription to ensure it’s active.
- Ensure that the
- Solution: These errors usually point to problems with Azure authentication or permissions.
- Incorrect Endpoint, Account Name, or Profile Name:
- Solution: Typos or mismatches in these critical configuration values are common.
- Carefully verify the “Trusted Signing Account Endpoint,” “Trusted Signing Account Name,” and “Certificate Profile Name” entered in HTML Executable’s code signing settings (Section 3.D) against the actual values in your Azure portal.
- Pay special attention to the regional specificity of the Endpoint URL; it must match the region of your Azure Trusted Signing Account.
- Solution: Typos or mismatches in these critical configuration values are common.
- Identity Validation Not Complete or Failed:
- Solution: Azure Trusted Signing, particularly for public trust certificates, requires successful identity validation.
- Check the status of your identity validation request in the Azure portal associated with your Trusted Signing Account. The certificate profile cannot be used for signing if the linked identity validation is not approved or is in a failed state.
- Solution: Azure Trusted Signing, particularly for public trust certificates, requires successful identity validation.
- Firewall or Proxy Issues:
- Solution: Network configurations can sometimes interfere with communication to Azure service endpoints.
- If you are behind a corporate firewall or proxy, ensure that it allows outbound HTTPS (port 443) connections to the Azure Trusted Signing endpoints (e.g.,
*.codesigning.azure.net). Consult your network administrator if necessary.
- If you are behind a corporate firewall or proxy, ensure that it allows outbound HTTPS (port 443) connections to the Azure Trusted Signing endpoints (e.g.,
- Solution: Network configurations can sometimes interfere with communication to Azure service endpoints.
B. Best Practices for Smooth Sailing
Adopting good habits can prevent many common problems and ensure a reliable code signing process over time.
- Regularly Check
az loginStatus: Especially if you sign applications infrequently, make it a habit to runaz loginbefore initiating a build that requires signing. Authentication tokens expire. - Keep Tools Updated: Periodically check for and install updates to the Microsoft Azure CLI, Microsoft Trusted Signing Client Tools, and the Windows SDK. Updates often include bug fixes, security enhancements, and new features.
- Secure Your Azure Credentials: Treat your Azure account credentials with the utmost care. Implement multi-factor authentication (MFA) and follow standard security best practices for managing access to your Azure resources.
- Verify Signature Post-Build: After HTML Executable compiles and signs your application, take a moment to verify the digital signature. In Windows Explorer, right-click the generated
.EXEfile, select “Properties,” and go to the “Digital Signatures” tab. You should see your signature listed, and its details should indicate it’s valid. This confirms the process worked as expected.
6. Conclusion: Distribute Your Signed Applications with Confidence
Successfully implementing code signing for applications generated by HTML Executable using Azure Trusted Signing marks a significant step towards enhancing the professionalism and trustworthiness of your software. By digitally signing your app executables, you provide end-users with crucial assurances: that the application genuinely originates from you, the publisher, and that it has not been tampered with since it was signed. This directly addresses user security concerns and helps mitigate the ominous warnings displayed by operating systems for unsigned software.
While the initial setup involves careful attention to Azure prerequisites, tool installations, and specific configurations within HTML Executable, the result is a robust, cloud-integrated signing solution. Once configured, Azure Trusted Signing, coupled with HTML Executable’s integration, can simplify the ongoing task of signing new builds of your applications.