Selling Ebooks And Publications With PayPal |
Automate Your Sales with PayPal and the HTML Executable Activation Kit
The Activation Kit seamlessly integrates PayPal support to automate sales and instant delivery of activation keys for your ebooks via email or the web. By creating a seamless bridge between your ebook/publication and PayPal, users can quickly and securely purchase access to your publications. Once the payment is confirmed, activation keys are automatically generated, reducing manual interventions and ensuring a smooth customer experience.
As a leading e-commerce platform, PayPal enables secure payments and money transfers through the Internet, serving as a convenient electronic alternative to traditional paper methods such as checks and money orders.
For optimal use of this feature, we recommend setting up a PayPal Business account.
PayPal Registration Handler
The PayPal Registration Handler is a powerful feature that allows you to sell licenses for your selected publication or ebook software using PayPal. With this tool, you can easily set up and manage your sales process, with several options available for customization.
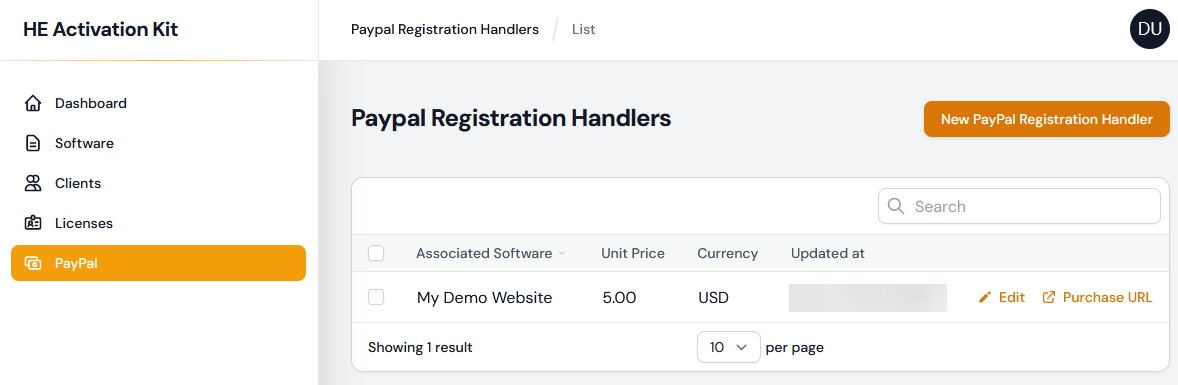
To add or edit a PayPal Registration Handler, use the "PayPal" page of the administration panel:
When you add or edit a PayPal handler, the following screen is shown:
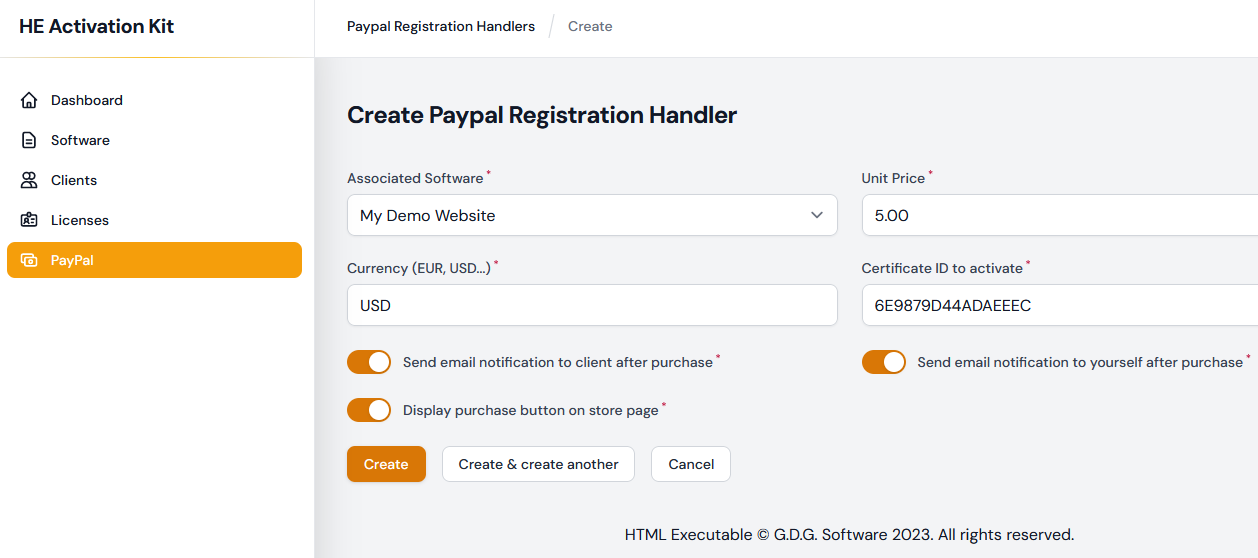
•Associated Software (mandatory): This field allows you to select the software for which you want to sell licenses.
•Unit Price (mandatory): This field allows you to set the price for each license sold.
•Currency (mandatory): This field allows you to select the currency in which the price will be displayed (e.g. EUR, USD, etc.).
•Certificate ID to activate (mandatory): This field allows you to specify the certificate ID that will be used to activate the software after purchase.
•Send email notification to client after purchase (mandatory): This option enables you to send an email notification to the client after their purchase, providing them with their activation key and other relevant information.
•Send email notification to yourself after purchase (mandatory): This option enables you to receive an email notification after each purchase, allowing you to keep track of your sales.
•Display purchase button on store page (mandatory): This option enables you to display a purchase button on your store page, allowing users to easily buy your software.
If the "Display purchase button on store page" option is enabled, the Activation Kit will generate a publicly accessible page that allows users to purchase your publication or ebook by paying with PayPal directly. The link to the purchase page will be available in the list (Purchase URL as shown below). This makes it easy for users to buy your software and for you to manage your sales process.

Setting the mandatory PayPal API settings
The HTML Executable Activation Kit uses the PayPal API to interact with the PayPal system to process payments, manage transactions, and perform other operations. To use the PayPal API, you need to provide your application with the necessary credentials, which include a client ID and a secret key. These credentials are used to authenticate your application when it makes API calls to PayPal.
To obtain these credentials, you need to create a developer account on the PayPal Developer website. Once you have created an account, you can log in and navigate to the "My Apps & Credentials" page. From there, you can create a new app and obtain your sandbox or live API credentials.
Once you have obtained your API credentials, you can add them to the application's `.env` file (in the application's root folder). This file is used to store environment-specific configuration values for your application. To add your PayPal API credentials, open the `.env` file in a text editor and add the following lines:
#PayPal Mode
PAYPAL_MODE=sandbox
#Paypal sandbox credential
PAYPAL_SANDBOX_CLIENT_ID=YOUR_CLIENT_ID_HERE
PAYPAL_SANDBOX_CLIENT_SECRET=YOUR_CLIENT_SECRET_HERE
Make sure to replace `YOUR_CLIENT_ID_HERE` and `YOUR_CLIENT_SECRET_HERE` with your actual sandbox client ID and secret key. Once you have added these values, save the `.env` file and your Laravel application will be able to use the PayPal API.
Change the mode from sandbox to live when you are ready for production.
⚠ It's important to note that the `.env` file should not be committed to your source control repository, as it contains sensitive information such as API credentials. |
After updating your PayPal information in the `.env` file, you can use the `php artisan config:cache` command to compile all of your configuration into a single file, which will be loaded quickly by the framework. This will allow you to make changes to your environment variables without having to restart the server. To clear the configuration cache, use the `php artisan config:clear` command. This will refresh the `.env` file and apply any changes you have made.
Your public store
This is the place where your customers can easily purchase and access your digital products.
When you visit the URL [https://[root of your HEAK website]/store] (for example, [https://www.mydomain.com/ebookactivation/store]), you'll be greeted with a user-friendly interface showcasing your digital offerings. This store page is designed to provide a seamless shopping experience for your customers, making it easy for them to browse, select, and purchase your products.
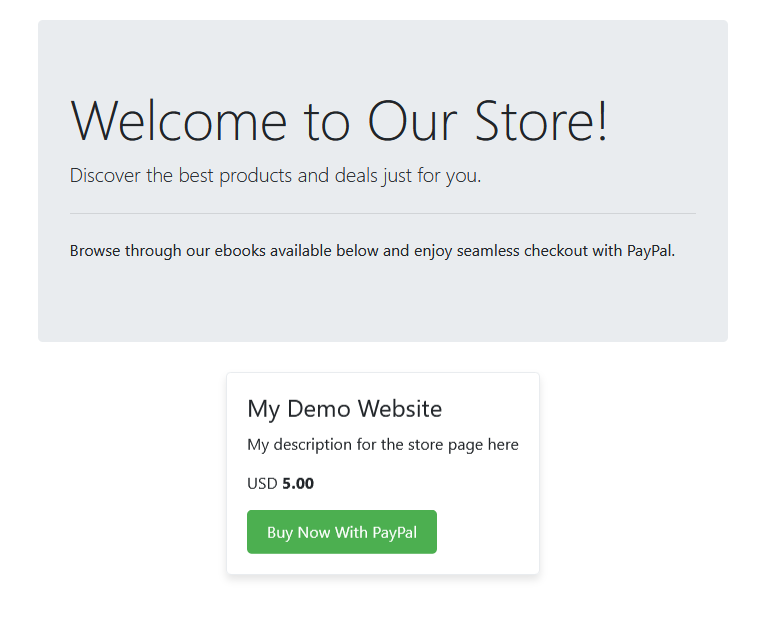
Whether you're selling ebooks, digital publications, or other types of digital content, your public store is a simple platform to connect with your customers and drive your digital sales.
Customizing the store page
You have the ability to customize the appearance and content of your store page by modifying the Laravel Blade template. The template is located at `resources\views\store.blade.php` in your application's directory.
By editing the `store.blade.php` file, you can change the layout, add new sections, display additional information, or customize the page in any way that suits your needs. This gives you the flexibility to create a store page that aligns with your brand and provides an optimal shopping experience for your customers.
The logo image file is located at 'public\images\header.png', you can replace it by yours.
Customizing notification emails
In the HTML Executable Activation Kit, you can customize the content of your email notifications by modifying the Laravel Blade templates.
Here are the steps to customize your email notifications:
•Locate the Blade Template: The templates for your email notifications are typically located in the `\resources\views\emails` directory of your application. For instance, if you want to customize the notifications for PayPal transactions, you might have two templates: `paypal-buyer-notif.blade.php` and `paypal-seller-notif.blade.php`.
•Modify the Template: Open the relevant Blade template file in a text editor. You can modify this file to change the structure and content of your email notifications. You can use any HTML and CSS in this file to style your email.
•Test Your Changes: After making changes, it's important to test your emails to ensure they appear as expected.
Troubleshooting: "client_id missing from the provided configuration" Error
When trying to purchase with PayPal, if you encounter the error "client_id missing from the provided configuration. Please add your application client_id" while using the PayPal Registration Handler, it means that your application's client ID is missing from the configuration.
👉 Solution
To resolve this issue, you need to update your PayPal information in the `.env` file located in the root directory of your application. This file contains important configuration information for your application, including your PayPal client ID. Please see the set up instructions above.