Install Application Files On Server |
To install the application on the server, you must first set up files on your server and optionally a symbolic link. Please follow these steps:
Unzip the files on your server
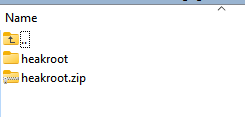
You will need to deploy the zip file "heakroot.zip" shipped in the "dist" subfolder containing all the files while maintaining the directory structure.

You can for instance upload the "heakroot.zip" file to the "public_html" directory of your web server using SSH or a server management application like cPanel.
Using SSH:
1.Connect to your server via SSH using a client such as PuTTY or the terminal on macOS or Linux.
2.Navigate to the "public_html" directory using the `cd` command.
3.Use the `scp` command to securely copy the "heakroot.zip" file from your local computer to the server. The command should look something like this: `scp /path/to/local/heakroot.zip [email protected]:/path/to/public_html/`
4.Once the file has been uploaded, you can use the `unzip` command to extract the contents of the zip file.
Using cPanel:
1.Log in to your cPanel account.
2.Navigate to the "File Manager" section.
3.In the left-hand panel, navigate to the "public_html" directory.
4.Click on the "Upload" button in the top menu and select the "heakroot.zip" file from your local computer.
5.Once the file has been uploaded, right-click on it and select "Extract" to extract its contents.
Following the extraction of the "heakroot.zip" file, a root directory named "heakroot" will be created in the "public_html" directory. You have the option to rename this directory as you wish, or you can leave it as "heakroot".
Setting Directory Permissions for the application
For the application to function correctly, certain directories and files need to be writable by the web server. These directories include:
1.`bootstrap/cache/`
2.`storage/`
You can use the `chmod` command in SSH to set permissions. It's recommended to set these directories to the `775` permission to ensure that the web server user and the group have write access.
To set the correct permissions for these directories, you can run:
chmod -R 775 storage/
chmod -R 775 bootstrap/cache/
Additionally, you might also need to ensure that the web server user (often `www-data` on many Linux distributions) owns these directories. You can achieve this with the `chown` command:
chown -R www-data:www-data storage/
chown -R www-data:www-data bootstrap/cache/
Accessing the application from the web
Laravel powers the HTML Executable Activation Kit application. In a standard Laravel installation, the entry point for the application is within the `public` subdirectory. This means that when accessing the application, you'd typically be pointing to the `public` directory to ensure proper functionality and security.
After completing the previous steps, you should be able to access the application by visiting:
[your website URL]/heakroot/public
in your web browser. For instance: https://www.mydomain.com/heakroot/public
If your server permits, you can redirect files to any directory of your choice by creating a symbolic link using SSH. This allows you to make one directory or file reference another without moving or copying the actual data. For example, to create a symbolic link from `heakroot/public` to `ebookactivation`, you would use the following command:
ln -s heakroot/public ebookactivation
This command creates a symbolic link named `ebookactivation` that points to the `heakroot/public` directory."
And thus, in your web browser, you could now access the application at https://www.mydomain.com/ebookactivation
WARNING: before continuing, please ensure the .env file in the root directory cannot be accessed from a web browser. The application secrets and private keys are in fact stored in the .env file, so it must not be accessible publicly. Ensure that the .env file has restricted file permissions. It should only be readable by the user that runs the web server and/or artisan commands. Setting the file permission to 640 is generally a good practice.